The Outlook data file (.pst) in the Outlook app contains all your important emails, contacts, notes, calendars, sent items, etc. The data file saves the hierarchy of the mailbox as it is. You do not have to create the data file manually, as Outlook does it automatically every time you create a new Outlook profile.
These PST files contain complete mailbox data and help you create additional data files. You can use these files for multiple purposes like archiving, categorizing, backing up, etc. However, instances may occur when you have to remove Outlook data files. This mainly occurs when you don’t need that PST file anymore. Here are some simple steps that will guide you on how to attach, import, and even remove imported PST files from Outlook.
Table of Contents
How to attach a PST file to Outlook?
Attaching PST files to Outlook allows you to access their contents as a separate Outlook data file. This means you can access these components of PST in your Outlook profile as a separate file. For this, you need to follow the below-mentioned steps to attach the PST file to Outlook.
Step 1
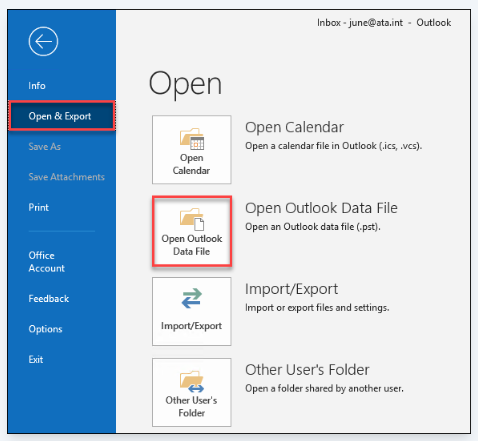
- Log in to your Outlook account and click File > Open & Export > Open Outlook Data File.
Step 2
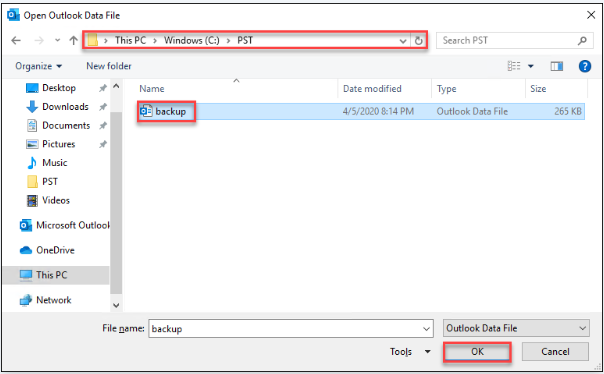
- Now, an Open Outlook Data File window will appear on the screen. Here, you need to browse the location where you want to add the PST file to Outlook.
Step 3
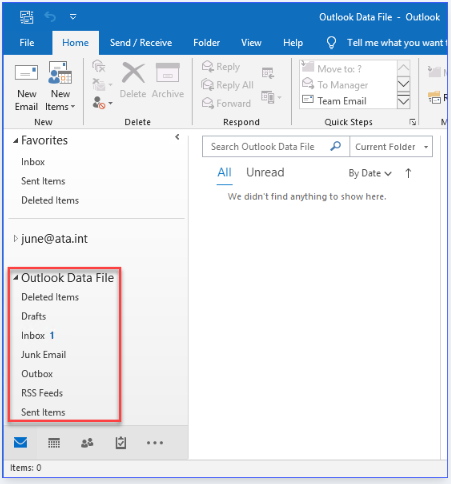
- After that, click the OK button when you have found the PST file.
- Next, a new folder with the name Outlook Data File will appear in the folder pane of your Outlook account.
The above steps will attach your PST file to Outlook. Now, it’s your choice whether you have to copy its contents into your mailbox or leave them in a separate PST file.
Import PST Files to Outlook using the Outlook Import Wizard
You can use the Outlook built-in feature called the Import and Export Wizard to import PST files to it. Running the import wizard is the only way for users to import a PST file into Outlook. This will help you import all or selected data from a PST file into your Outlook mailbox of Outlook. All you have to do is
Step 1
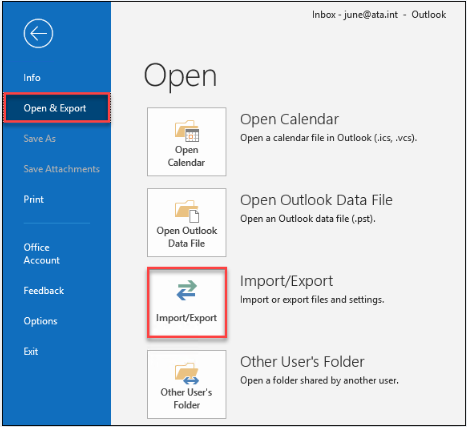
- While in Outlook, go to File > Open & Export > Import/Export.
Step 2
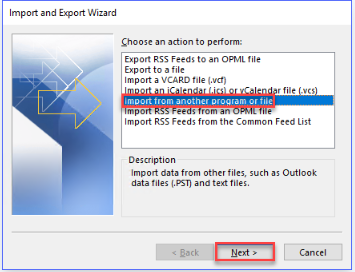
- Now, from the Import and Export Wizard window, select the “Import from another program or file” option. Then, hit the next button.
Step 3
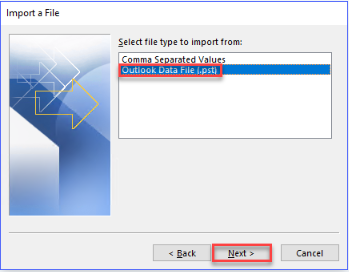
- Then, an “Import a File” window will appear on the screen. Select Outlook Data File (.pst) and click Next to continue.
Step 4
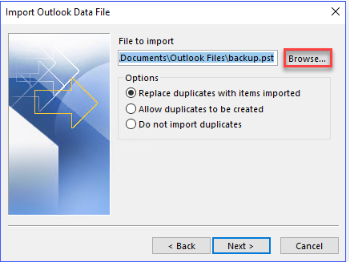
- Click on the Browse button located in the Import Outlook Data File window.
Step 5
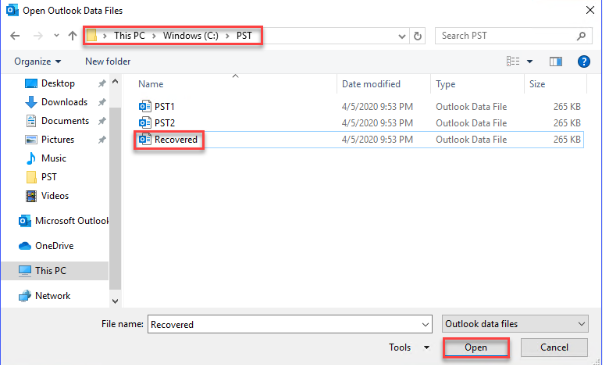
- Locate the PST file from where you want to import the emails and click Open. In this example, the file is in C:\PST\Recovered.pst.
Step 6
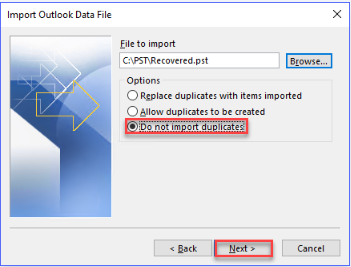
- Go back to the Import Outlook Data File window, and make sure that the File to Import box is showing the file. Click the “Do not import duplicates” button to prevent duplicate files from being imported. Click Next.
Step 7
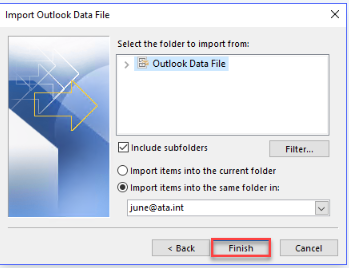
- Now, select the subfolders that you want to import items from. In this example, we have selected the top folder and will include all subfolders.
- At last, click the “Finish” button to complete the importing process.
What is stored in a PST file?
PST files, also known as Personal Storage Tables, contain all information related to your Outlook account. However, in this section, we have mentioned some components of a PST file that you must be familiar with:
- Inbox: The place where all your incoming emails are received.
- Outbox: A folder from which you can access all your sent emails. These emails are kept in the outbox temporarily until they are sent to the recipient.
- Sent Items: It stores all the emails sent from your account.
- Junk Email: The Junk Email folder consists of all your spam and junk emails.
- RSS Feeds: A folder that contains all the latest feeds from where you have subscribed.
- Contacts: This allows you to save all your contacts with their names and email identities for quick access.
- Calendar: You can use the calendar to schedule and create appointments, events, meetings, etc.
So, these are a few components that a PST file holds. You can create multiple PSTs as per your needs, for different purposes, or to separate your data. If any of these components are causing problems for you, apply Outlook PST repair methods to fix them. If you have any Outlook data files that you don’t need anymore, it is good to remove them from Outlook.
How do I remove the imported PST file from Outlook?
Removing PST files from Outlook 2019, 2016, and other versions is a quick and simple process. All you have to do is:
Step 1
Start MS Outlook and navigate to File >> Info >> Account Settings. Then, select Account Settings.
Step 2
Select the data file that you want to remove and press the Remove button. From the dialogue box that appears on the screen, choose Yes.
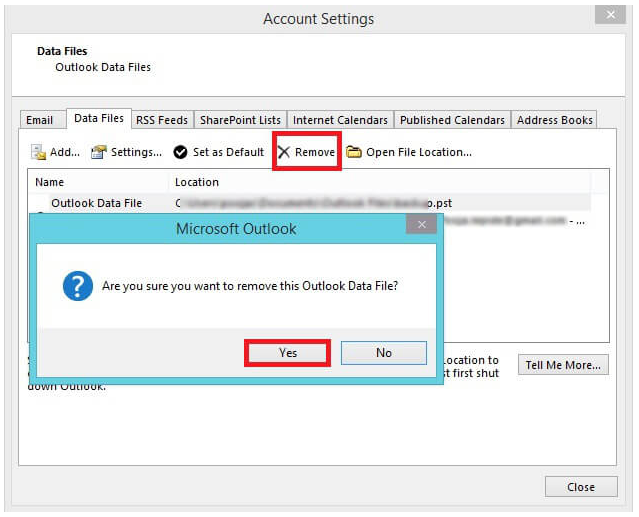
That’s it! The above steps will help you remove your imported PST file from Outlook.
Don’t want to remove the PST file from Outlook? Repair Them!
Before deleting PST files from Outlook, make sure you won’t need them in the future. However, it is better to repair your corrupt PST files instead of removing them. Outlook has a built-in repair tool, ScanPST that you can use to fix any complex issue with your Outlook file.
There are several third-party programs, like Stellar Repair for Outlook, that you can use to repair PST files in Outlook. The Stellar Outlook recovery tool recovers deleted emails and other mailbox items with 100% integrity and precision. You can even use this tool to recover all mailbox items, like emails, attachments, contacts, calendar items, journals, notes, etc. The software even converts these items into a new PST file, readily importable in Outlook.
Conclusion
All the methods, whether importing PST files or deleting imported PST files from Outlook, do not require high technical skills. If you experience any issues with the above steps or your PST file is not accessible, you can repair them using the third-party tool Stellar Repair for Outlook. This tool offers various features to efficiently repair your corrupt PST file.


