There is no greater satisfaction for a real gamer than playing their favorite games on the highest graphic settings without delays, lags, or FPS drops. Most hardcore gamers believe that having the best hardware to run a game is all they need.
But this is not the case in reality. You can have all these things, but still not achieve a good performance in the game or the quality of the game. If you use an NVIDIA graphics card then the reason behind this is that you have not optimized the NVIDIA Control Panel Settings for the best performance game.
In this guide, we’ll show you the best settings that are available in the Nvidia control panel for 2020, luckily you have stumbled upon the ultimate optimization guide for the Nvidia control panel.
We offer a very fast and easy-to-follow guide on how to fully optimize the Nvidia control panel, which should result in a significant increase in your gameplay while playing games and overall performance. You will notice an increase in FPS in just about every game you play.
Table of Contents
Introduction to NVIDIA Control Panel Optimization
If you’re a gamer, you know there’s nothing quite like the thrill of seeing your favorite game run smoothly in ultra-high settings. But sometimes, even with a powerful graphics card, your gameplay doesn’t feel as fluid as it should. That’s where the NVIDIA Control Panel comes in.
Most gamers think that having top-tier hardware is all it takes to get the best performance. While that’s a big part of it, software optimization plays an equally important role, especially when it comes to unlocking your GPU’s full potential.
The NVIDIA Control Panel is a powerful tool that allows you to fine-tune how your games perform and look. It offers a wide range of settings—from how your graphics card handles textures, shadows, and lighting to how much power it consumes during gameplay. These settings directly impact your in-game experience, often making the difference between a stuttering frame rate and a buttery-smooth session.
By tweaking the right settings in the control panel, you can:
Increase FPS in almost every game
Reduce input lag and screen tearing
Enhance visual quality without compromising performance
Most Optimized Control Panel Settings for Nvidia
Before we start sharing the different settings, you must have your NVIDIA graphics card drivers updated.
You Can Download the latest driver from here
The best way to do this is by downloading the NVIDIA GeForce Experience.
Once you have downloaded and installed the NVIDIA GeForce Experience, click the Download button in the Updates section of the Automatic Driver Updates section. This will download a program that detects your graphics card model and automatically installs the appropriate driver for you. After this, a quick reboot is needed to apply the changes. Now that you have the latest drivers installed, you can follow the settings of the control panel.
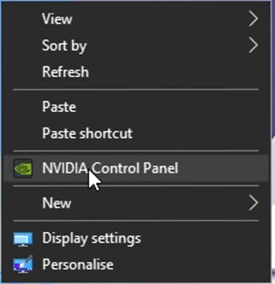
Right-click on your computer’s home screen and open the Control Panel.
3D Settings
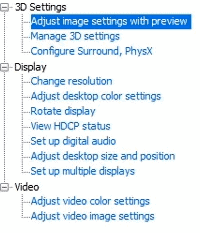
With this setting, you can define the visual quality of the game of your choice.
There will be a slider “Use my preference emphasizing.”
With this, you can adjust the slider as desired.
For advanced settings,
check the box labeled “Use the advanced 3D picture settings.”
These advanced settings provide several new features and settings that your game does not feature. It will make your gaming experience even better.
Now select “Manage 3D Settings” in the left sidebar.
There are many good options here that you can take a look at and experiment with them to see what effects they bring to your game.
There is a “Restore” button you can click on to bring all the settings to the default so do not worry if you mess up a few settings and start experimenting to see what are the use cases of different options.
There are two tabs here. One is “Global Settings” and the other is “Program Settings.”
Just change the settings for a specific game, you must manage the controls in the program settings.
Keeping your NVIDIA graphics drivers updated is one of the most important steps before optimizing any settings. Outdated drivers can lead to poor game performance, visual glitches, or even crashes. Updating correctly ensures your GPU performs at its best with the latest game and software optimizations.
To update manually, first visit the official NVIDIA Driver Download page. Enter your GPU details (like GeForce GTX 1660 or RTX 3060), and download the latest Game Ready Driver. Once downloaded, run the installer and choose Custom Installation. This gives you the option to do a clean installation, which removes the old drivers completely before installing the new ones—ideal for resolving bugs or performance issues.
How to update your NVIDIA graphics drivers correctly?
Keeping your NVIDIA graphics drivers updated is one of the most important steps before optimizing any settings. Outdated drivers can lead to poor game performance, visual glitches, or even crashes. Updating correctly ensures your GPU performs at its best with the latest game and software optimizations.
To update manually, first visit the official NVIDIA Driver Download page. Enter your GPU details (like GeForce GTX 1660 or RTX 3060), and download the latest Game Ready Driver. Once downloaded, run the installer and choose Custom Installation. This gives you the option to do a clean installation, which removes the old drivers completely before installing the new ones—ideal for resolving bugs or performance issues.
Ambient Occlusion
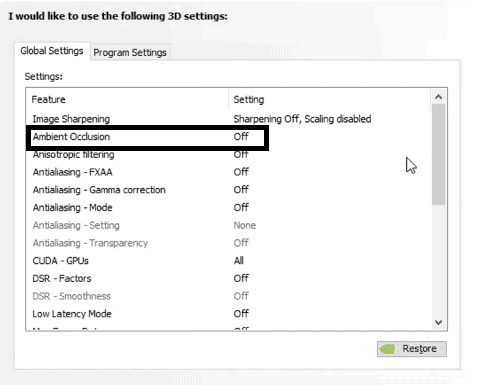
It is a technique for adjusting shading and rendering used in computer graphics. It is used to calculate how much exposure the scene has to ambient lighting.
For example, in a tube, there will be more occlusion and it will be quite dark compared to the exposed parts.
In games, ambient occlusion is calculated for each point of the scene having an open sky with ambient lighting. With this technique, the appropriate lighting effects and shadow detail can be given to all scenes in a game.
You can turn on / off as needed. The quality of gameplay will surely improve by turning on this option.
If you feel this setting has been hurting the game you can turn it off.
Anisotropic Filtering
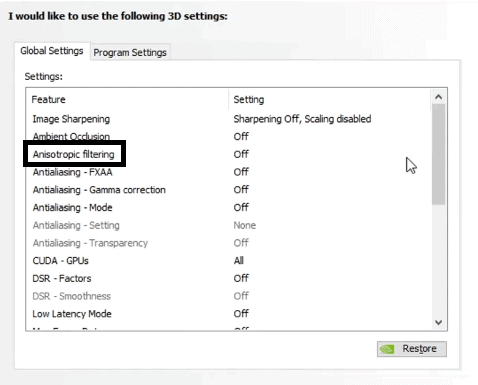
It is a method of improving the textures of image quality in games. With this technique, the surfaces seem much clearer to your player when you move ahead, you will notice that the surface does not appear blurred but looks sharp.
If your Anisotropic Filtering is turned off, the surface will appear blurry to you, but when you turn it on, you will see the detailed surface. It consumes higher memory bandwidth, but it will enhance your experience of playing games.
You must set the setting at a maximum of 16X value for the best results. The other is 8X which will not give a much-improved experience compared to that given by 16X.
Just turn on this setting and improve your texture filtering!
Anti-Aliasing FXAA
Anti-aliasing is a technology to eliminate the jaggy effects that you encounter in staircases while playing the game. By reducing these effects, it makes the game much smoother.
FXAA means Fast Approximate Anti-Aliasing. Many people also refer to it as Fast Sample Anti-Aliasing (FSAA). It is a form of anti-aliasing.
FXAA does not require a lot of computing power compared to the standard spatial anti-aliasing. Adverse jagged edges are converted into pixels and this way the game becomes very smooth providing you much better gaming experience.
Anti-Aliasing Mode
Different methods are used through which you can implement image pixel-smoothing anti-aliasing, this setting helps you to smoothen the image and make it appear more realistic. You can use the game settings and hardware settings to enhance the appearance of the game. You can “enhance” or “override” too. Also, opt for a program-specific tab if you are looking to improve the experience of a specific game.
Anti-Aliasing Settings
With this setting, you can control the amount of anti-aliasing sampling used. The higher the value you set, the better the graphic quality gets but you may also face a bit of lag while playing the game as it would use more than the required computational power. You can change it to the maximum and if you find that the game experience is very slow, then you can switch it back to normal.
Anti-Aliasing Transparency
This setting gives a smooth appearance to objects such as trees, fences, rocks, etc. These elements have unique requirements that are not met by conventional forms of anti-aliasing.
With this setting, you can provide these elements with a special form of anti-aliasing. Change it to the maximum and check how it performs.
Texture Filtering and Optimisations
These options are good for systems with older hardware. Texture filtering will improve dramatically the optimizations of older hardware. For this, turn off Anisotropic settings and change it to the maximum.
Power Management Tool
Do you want to save power while you play the game? Then you should learn more about this setting as this will help you reduce power usage. You can start with “Adaptive.” If you see problems arising while playing the game if it makes the game lag, the game processes slower, etc. then switch to “prefer maximum performance.”
Max Frame Rate
This limits the FPS games to a number beyond which the game can not go. This setting should be disabled for better performance. Don’t set the Maximum Frame Rate as if you enable this setting the game will try to achieve that and in return, it may cause heating issues.
DSR-Factors
DSR or Dynamic Super Resolution improves the image quality in-game by processing the image in high resolution. This setting reduces your FPS and increases Lag. This setting should be disabled for better performance.
Low Latency Mode
This setting reduces latency by limiting the number of frameworks that need to be processed by the CPU before the images are processed by the GPU. This should be enabled to get higher FPS and low lag.
Monitor Compatibility
Each monitor comes with its predefined refresh rate. This technique controls the refresh rate of a connected monitor. It is applicable only if you use an external monitor. For laptops, it is disabled by default. For desktop computers, select G-Sync Compatible if available, or select Another Fixed Refresh Rate according to your monitor.
Preferred Refresh Rate
This setting allows you to override the refresh rate when you are playing games in full screen. This option must be changed to the highest according to the GPU you have. This would enhance your gaming experience as well as lower the lag you may be encountering.
OpenGL Rendering GPU
This specific setting is really important to play the game lag-free as this setting selects the GPU to run games that use OpenGL. This setting must be selected for your NVIDIA graphics card.
Change Resolution
Select the screen resolution as high as possible in the Resolution section. Similarly, select the highest possible refresh rate in the Refresh Rate section.
Scroll below and select Use NVIDIA color settings. For the different sub-settings, change Color Depth Desktop to highest (32 bit), RGB color format as output, and the output dynamic range to full. Click Apply to save the settings.
This would surely improve your game experience if it starts to lag try reducing the screen resolution.
Adjust Video Image Settings
Keep the settings to default if they aren’t or you have changed them in the past switch them back to as they were earlier or simply reset the settings to default. After completing each change, restart your computer to apply all changes.
Adjust Desktop Color Settings
These settings increase the vibrance of game colors by up to 80%. This means that the colors appear more saturated and vibrant rather than appearing dull. You can apply these settings in the enhancement section.
CUDA GPUs
This allows you to select all the games and other applications where CUDA cores are used. This should be selected as all to give the best performance. CUDA cores are parallel processors within the Nvidia Graphics Processing Unit (GPU). Nvidia GPU has thousands of CUDA cores to give a better gaming experience to all game lovers. Though these CUDA cores aren’t as powerful as CPU cores, they are specifically designed to work along with GPU to process visual data quickly which allows for minimizing the lag.
Virtual Reality Pre-Rendered Frames
These settings help improve the graphic quality of virtual reality games. This limits the number of frames that can be processed by the CPU before they are processed by the GPU. This setting must be selected to 1. After applying all the settings, click the Apply button.
All these settings are reset to default once you update your Nvidia Graphics Driver. You must change the settings after each new update.
It’s all about the guide to setting your NVIDIA Control Panel settings best performance while playing AAA games. You can also overclock your GPU to increase the GPU performance.
Also read: The Titan X vs. the GTX 1080: Which is Better for Gaming?
Verdict
So, here is a glimpse of some of the important settings of the NVIDIA control panel. Just experiment and see how your game improves. If something doesn’t work right, there is always an option to switch back to the default settings. So play a bit with the settings in the control panel.
You must first experiment with a specific game that does not have a smooth graphic implementation experience. Then, give the above settings a try and see what impact they have. This will help you understand the functionality of the different settings too.
After determining the role of these settings in a specific game, you can try these settings in other games too. If you make a mistake, do not worry; we have the Restore button ready to change the defaults.

